Building a Django Continuous Integration and Delivery Pipeline to AWS
Building a CI/CD (Continuous Integration / Continuous Delivery) flow for your web application is a must nowadays. With so many things that can go wrong, and the amount of time and effort the deployment process of an application takes, a flow like this will give you peace of mind that your application is running without (or with less) errors and that your application will be production ready on every new commit to its source code.
In this post I want to talk about building such a pipeline, with emphasis on deploying a Django 1.11 application to AWS ElasticBeanstalk, which is an Amazon service very similar to Heroku. Additionally I will talk about how to include other services to the delivery flow, such as Amazon S3 for storage of static files and Amazon RDS (Relational Database Service) for a relational database that will be connected to our application.
The pipeline will work as follows:
- Code will be pushed to source control repository. For this article, I will use Github.
- Project will be built and tested in a CI job at TravisCI.
- TravisCI will perform a deployment to ElasticBeanstalk once the build passes successfully.
We will be using both the ElasticBeanstalk CLI (ebcli) and the AWS ElasticBeanstalk Console to achieve this.
Creating the ElasticBeanstalk Application and Environment
Before we can even start building our pipeline, we have to first create an ElasticBeanstalk application and an environment for this application in the AWS ElasticBeanstalk Console. Otherwise when we our CI/CD pipeline runs, we will receive errors such as no application named .
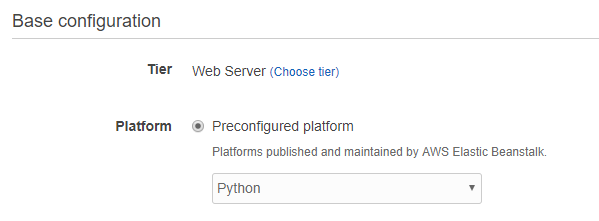
Head over the the Elasticbeanstalk service in the AWS Console and create a new application. After that, create a new environment and select Web server environment as the environment type, and select a Python platform:
WSGI Path
After the environment process is finished, we will proceed to change the preconfigured path to the WSGI file that ElasticBeanstalk uses (application.py by default). Head over to Configuration > Software and you will see a field where we can specify a custom path. This path will depend on the location of the wsgi.py file in your Django application:
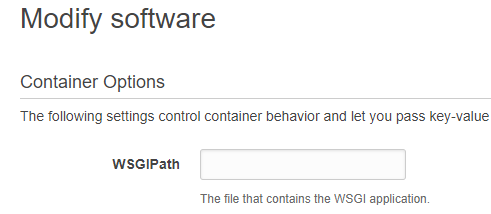
If the WSGI path configuration is not correctly set. You will get a log error in your dashboard saying ERROR Your WSGIPath refers to a file that does not exist., and when you try accessing your application with the generated URL, you will get a 404 not found error page.
Environment Variables
We will need to set some environment variables in the environment's configuration. To set these variables, got to Configuration > Software > Environment properties. We will configure the following settings:
AWS_ACCESS_KEY_IDAWS_SECRET_ACCESS_KEYDJANGO_SETTINGS_MODULE
For the AWS Credentials variables, you can create a IAM User and use those users credentials. For the DJANGO_SETTINGS_MODULE you will need to specify a path to your settings.py settings module in your Django application. If you are using a multi-module settings configuration, you will need to point to the correct module. Usually this will be the production settings file.
Static and Media Files With S3
We will need to correctly configure our Django application and our ElasticBeanstalk application so that static files and media files work properly. This was an extremely tedious and frustrating process for me, but turns out to be really simple (like everything huh!).
Django Configuration
I am going to store media files in S3 and static files in the same server of the Django application, but you can store both in S3 if you'd like. Take a look at this article for details on that.
I will be following a similar approach to that article, so make sure you install django-storages and boto3 and include them in your installed apps.
Also, since I am using a multi-module settings configuration, I will add the necessary configurations in a prod.py settings module:
import os

from .common import *


# AWS
AWS_ACCESS_KEY_ID = os.environ['AWS_ACCESS_KEY_ID']
AWS_SECRET_ACCESS_KEY = os.environ['AWS_SECRET_ACCESS_KEY']

# Static Files
STATIC_ROOT = os.path.join(BASE_DIR, '..', 'www', 'static')
STATIC_URL = '/static/'


# MEDIA FILES
MEDIAFILES_BUCKET = 'myapp-media'
AWS_S3_REGION_NAME = 'sa-east-1'
AWS_S3_CUSTOM_DOMAIN = '%s.s3.amazonaws.com' % MEDIAFILES_BUCKET
DEFAULT_FILE_STORAGE = 'custom_storages.MediaStorage'

AWS_S3_OBJECT_PARAMETERS = {
    'Expires': 'Thu, 31 Dec 2099 20:00:00 GMT',
    'CacheControl': 'max-age=94608000',
}
Those AWS credential settings are the ones that will be picked up in the instance after the deployment. They are the exact credentials we set before as environment variables.
Notice the DEFAULT_FILE_STORAGE configuration. This tells Django where to store media files. We will implement media file storage in S3 by creating a special storage class in a custom_storages.py module at the root of our application:
from django.conf import settings

from storages.backends.s3boto3 import S3Boto3Storage


class MediaStorage(S3Boto3Storage):
    bucket_name = settings.MEDIAFILES_BUCKET
We simply tell the class in what bucket we want to store those media files.
ElasticBeanstalk Configuration
Now in the AWS ElasticBeanstalk console head over to Configuration > Software > Static files and set the following configuration:
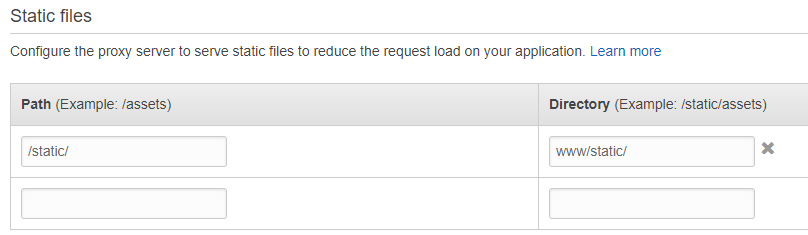
That configuration will work properly along with the STATIC_ROOT and STATIC_URL settings we added in Django.
~> Since we are now storing media files and/or storage files in S3. We will need to use the correct references to these assets in our templates, otherwise they will not be able to be fetched in the deployed application.
For static files use <img src="{% static '/url' %}">
For media files use something like <img src="{{ myobject.avatar.url }}">
One of the biggest issues I found when using this deployment workflow was setting up the static files correctly in the ElasticBeanstalk environment after the app is deployed. Initially I tried using the after_deploy stage in .travis.yml:
after_deploy:
  - python manage.py collectstatic
But this would simply just get executed in the same TravisCI environment, not in the ElasticBeanstalk instance.
Setting Up RDS (Relational Database Service)
We will want our database to live outside the instance that is holding the application. To do this, go to your dashboard, Configuration > Database and add the settings that resemble your development database settings. In my case I am using Postgresql 9.6.
After you assign the RDS database, RDS will expose the database and user credentials via environment variables, which we can access from our Django application. This means that we could set the following production configuration in our application:
# settings/prod.py

import os

from .common import *


DEBUG = False

# DATABASE
if 'RDS_DB_NAME' in os.environ:
    DATABASES = {
        'default': {
            'ENGINE': 'django.db.backends.postgresql_psycopg2',
            'NAME': os.environ['RDS_DB_NAME'],
            'USER': os.environ['RDS_USERNAME'],
            'PASSWORD': os.environ['RDS_PASSWORD'],
            'HOST': os.environ['RDS_HOSTNAME'],
            'PORT': os.environ['RDS_PORT'],
        }
    }
Levaraging ebcli
We will need to leverage the ElasticBeanstalk CLI (ebcli) in order to run necessary tasks after deployment inside the instance. These tasks are (not limited to):
- Create a Django superuser
- Run Migrations
- Collect static files
The way ebcli does this is through a configuration folder called .ebextensions in the root of the repository. This directorycontains the steps in YAML on how to perform these tasks. For example:
# django.config

container_commands:
  01_migrate:
    command: "source /opt/python/run/venv/bin/activate && python manage.py migrate --noinput"
    leader_only: true
  02_auto_createsuperuser:
    command: "source /opt/python/run/venv/bin/activate && python manage.py auto_createsuperuser"
    leader_only: true
  03_collectstatic:
    command: "source /opt/python/run/venv/bin/activate && python manage.py collectstatic --settings=myapp.settings.prod --noinput"
  04_wsgipass:
    command: 'echo "WSGIPassAuthorization On" >> ../wsgi.conf'
This .ebextensions directory should be commited to your repository's source control. When you run the command eb deploy, it will bundle your application and deploy it to the ElasticBeanstalk environment we created before, and run those commands.
-> The WSGIPassAuthorization On setting must be set in the WSGI configuration in order to be able to pass authorization headers in your application. If you are using Django REST Framework's TokenAuthorization and this setting is not set, you will not be able to perform requests even with a valid token.
~> Django's createsuperuser command does not support passing in a password as input. This is why I am using a custom command called auto_createsuperuser which automatically creates a super user in the database using hard coded credentials.
Building the Pipeline
Finally we can start creating the CI/CD pipeline. Assuming that your project's source code is hosted in a Github repository, head over and register an account at TravisCI.
Afterwards, go to your Github repository's Settings > Integrations & services > Add service and choose TravisCI. Sign in to TravisCI and add this repository to the list.
Pipeline Configuration
We will place the configuration in a .travis.yml file at the root of the repository. This configuration will tell Travis what to prepare in the build and how to run the tests.
In my case, I am using pytest and pytest-dango for my test suite, and PostgreSQL 9.6 for my database:
language: python

python:
  - "3.6"

services: postgresql

install:
  - pip install -r requirements.txt
  - pip install -r requirements-dev.txt

before_script:
  - flake8 .
  - psql -c "CREATE DATABASE mydb;" -U postgres
  - psql -c "CREATE USER myuser WITH PASSWORD 'password';" -U postgres
  - psql -c "ALTER USER myuser CREATEDB;" -U postgres
  - python manage.py migrate

script:
  - pytest --nomigrations

addons:
  postgresql: "9.6"

deploy:
  provider: elasticbeanstalk
  access_key_id: $ACCESSKEYID
  secret_access_key:
    secure: "$SECRETACCESSKEY"
  region: "us-east-1"
  app: "myapp"
  env: "myapp-prod"
  bucket_name: "myapp"
  on:
    branch: master
=> Notice how we are passing sensitive AWS credentials through environment variables. You can set these in TravisCI at Your repository > More Options > Settings > Environment Variables Make sure that the names match this configuration.
Make sure that the app and env values match the correct values you used when creating the application and environment in ElasticBeanstalk.
~> AWS S3 Bucket names are unique names accross all users and domains. This means that you must select a bucket name that hasn't already been taken, or else your deployment will fail.
After this configuration is added to your repository, the next push to the master branch will trigger this CI/CD pipeline and if successfull, will begin deploying to ElasticBeanstalk.
A Note on TravisCI ElasticBeanstalk Deployment
Sadly the deployment from TravisCI to ElasticBeanstalk will not run the commands we configured in .ebextensions. This is probably because dpl (TravisCI's deployment tool) does not use ebcli to deploy the application.
You might be tempted (like I did) to try and use the after_deploy hook in .travis.yml as mentioned in the docs, like this:
after_deploy:
  - python manage.py collectstatic --settings=myapp.settings.prod --noinput
Unfortunately the above will run inside the TravisCI build machine and not in the AWS instance.
However though, maybe you could still install ebcli inside the travis build and create a .sh file that contains the ebcli deploy command and execute it. But I haven't gotten to test this yet.
References
- https://www.caktusgroup.com/blog/2017/03/23/hosting-django-sites-amazon-elastic-beanstalk/
- https://realpython.com/blog/python/deploying-a-django-app-and-postgresql-to-aws-elastic-beanstalk/#using-s3-for-media-storage
- https://www.caktusgroup.com/blog/2014/11/10/Using-Amazon-S3-to-store-your-Django-sites-static-and-media-files/
- https://www.caktusgroup.com/blog/2017/08/28/advanced-django-file-handling/
- https://docs.aws.amazon.com/elasticbeanstalk/latest/dg/create-deploy-python-container.html