Dropdown Toolbar Buttons in Netbeans Platform
It is possible to add buttons that toggle a dropdown menu to the main toolbar in your Netbeans Platform application.
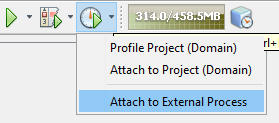
For example, the Netbeans IDE Run Project, Debug Project, and Profile Project buttons have a small arrow next to them. When clicked, a dropdown menu with more related actions is shown:
In this article, I will teach you how to implement this behavior.
The Default Action
We will begin by creating the default action. This is the action that will appear next to the dropdown arrow, and gets triggered when clicked.
We will create this action in its own Java class, and register this action using annotations:
import java.awt.event.ActionEvent;
import java.awt.event.ActionListener;
import org.openide.awt.ActionID;
import org.openide.awt.ActionReference;
import org.openide.awt.ActionRegistration;
import org.openide.util.NbBundle;

@ActionID(
    category = "Main",
    id = "com.aalvarez.mymodule.MyMainAction"
)
@ActionRegistration(
    iconBase = "path/to/icon.png",
    displayName = "#CTL_MyMainAction"
)
@NbBundle.Messages("CTL_MyMainAction=Run MyMainAction")
public class MyMainAction implements ActionListener {

  public MyMainAction() {

  }

  @Override
  public void actionPerformed(ActionEvent evt) {
    // Action logic goes here
  }
}
The category and id attributes of the @ActionID annotation are very important. Make sure you name them appropriately.
Notice that we are not registering this action in the toolbar (usually done with the @ActionReference annotation). This is because we will later create an action that will contain this default action as well as all the other actions we want to include in the dropdown menu.
The Dropdown Actions
Now we will proceed to create all this actions that will appear in the dropdown menu. In this step you are free to create as menu actions as you need, but for teaching purposes I will just create one action.
These actions are created and registered just like we did with the default action:
import java.awt.event.ActionEvent;
import java.awt.event.ActionListener;
import org.openide.awt.ActionID;
import org.openide.awt.ActionReference;
import org.openide.awt.ActionRegistration;
import org.openide.util.NbBundle;

@ActionID(
    category = "Main",
    id = "com.aalvarez.mymodule.MySecondAction"
)
@ActionRegistration(
    iconBase = "path/to/other/icon.png",
    displayName = "#CTL_MySecondAction"
)
@NbBundle.Messages("CTL_MySecondAction=Run MySecondAction")
public class MySecondAction implements ActionListener {

  public MySecondAction() {

  }

  @Override
  public void actionPerformed(ActionEvent evt) {
    // Action logic goes here
  }
}
Now that we have two different actions we can proceed to the final step: Putting them together into a button and dropdown menu.
The Dropdown Button
To achieve this behavior, we will create one more action. This action will implement the Presenter.Toolbar interface, which lets us decide how we want this action to look like in the toolbar:
import java.awt.Component;
import java.awt.event.ActionEvent;
import java.awt.image.BufferedImage;
import javax.swing.AbstractAction;
import javax.swing.Action;
import javax.swing.ImageIcon;
import javax.swing.JButton;
import javax.swing.JMenuItem;
import javax.swing.JPopupMenu;
import org.openide.awt.ActionID;
import org.openide.awt.ActionReference;
import org.openide.awt.ActionRegistration;
import org.openide.awt.Actions;
import org.openide.awt.DropDownButtonFactory;
import org.openide.util.actions.Presenter;

@ActionID(
    category = "Main",
    id = "com.aalvarez.mymodule.MyDropdownAction"
)
@ActionRegistration(lazy = false, displayName = "NOT-USED")
@ActionReference(path = "Toolbars/Main", position = 0)
public class MyDropdownAction extends AbstractAction
    implements Presenter.Toolbar {

  private final Action DEFAULT_ACTION = Actions.forID("Main",
          "com.aalvarez.mymodule.MyMainAction");

  @Override
  public void actionPerformed(ActionEvent ae) {
    // Delegated to getToolbarPresenter()
  }

  @Override
  public Component getToolbarPresenter() {
    JPopupMenu popup = new JPopupMenu();

    Action mySecondAction = Actions.forID("Main",
            "com.aalvarez.mymodule.MySecondAction");
    JMenuItem menuItem = new JMenuItem(mySecondAction);

    // You can fetch and add more actions to the popup here
    popup.add(menuItem);

    // The button that will display the default action and the
    // dropdown arrow
    JButton button = DropDownButtonFactory.createDropDownButton(
      new ImageIcon(
        new BufferedImage(16, 16, BufferedImage.TYPE_INT_ARGB)
      ),
      popup
    );

    Actions.connect(button, DEFAULT_ACTION);

    return button;
  }
}
This action is registered in the toolbar. In this example, it is registered in a custom toolbar called Main, derived from the name after the / in Toolbars/Main.
Notice how we are fetching the previously defined actions using Actions.forID() method and each action's category and id attributes defined in their respective annotations.
Another important element here is the DropDownButtonFactory utility class provided by the platform. This is what gives us that nice button with dropdown arrow UI effect that we are looking for.
One last thing to notice is that we are no longer implementing ActionListener, but rather extending AbstractAction.
That's it! Super simple.