Custom Pages in Zenoss
In a previous post I talked about how to create custom navigation links in Zenoss using a ZenPack. However we didn't get to creating the custom pages that these links would link to. This is what we will learn today.
Page Viewlets
Previously we created navigation item viewlets, this time we will be creating page viewlets. These type of viewlets allow us to create and insert new custom pages into Zenoss where we can display custom content. To create a new page, we add the following code to browser/configure.zcml:
<browser:page
  name="secondaryPage"
  for="*"
  permission="zenoss.View"
  template="templates/my_template.pt"
  />
It is important that the name attribute matches the URL of the navigation link we created previously. Another important attribute is the template attribute, this is a special file that will represent the base markup of the page using a combination of HTML, TAL, and METAL.
Also let's not forget to create a necessary python init file:
touch browser/__init__.py
Zope & Zenoss Templates
We will proceed and create the my_template.pt template in a new templates directory:
browser/templates/
touch browser/templates/my_template.py
The template code will basically consist of different tags that will represent slots. We can use tags to fill these slots with content and JavaScript, this is how we populate the page with content. A basic template file skeleton would look like this:
<tal:block metal:use-macro="here/page_macros/base-new">
 <tal:block metal:fill-slot="title">YOUR TITLE HERE</tal:block>

 <tal:block metal:fill-slot="head-local">
    <meta http-equiv="X-UA-Compatible" content="IE=edge" />
 </tal:block>

 <tal:block metal:fill-slot="center_panel_content">
 </tal:block>

 <tal:block metal:fill-slot="script_layout">
 </tal:block>

</tal:block>
Notice that we are leaving some slots unfilled for now, we will proceed to fill them later. The 1st line of the code above is very important:
<tal:block metal:use-macro="here/page_macros/base-new">
This code allows us to inherit from one of the many built-in Zenoss templates available. Each template has different page layout characteristics such as columns, menu bars, and other components. In this case we are using the base-new template.
You can see the list of templates that we can use by checking out the source code in $ZENHOME/Products/ZenUI3/browser/macros.py. These .pt template files are located in $ZENHOME/Products/ZenUI3/browser/templates.
Adding Content to the Page
If we restart zopectl we can already see that the link works and it actually takes us to the new page that uses the base-new template. In the center we will see a big white space that is actually an ExtJS panel called center_panel. To add new stuff to this available area we need to do so using ExtJS framework.
Let's say we want to add a D3 (Data Driven Documents) example like Mobile Patent Suits into the panel. First we need to include the JavaScript reference to the D3 library inside the script_layout slot, at the same time we can also add the CSS for the D3 visualization, and lastly the JavaScript code that will render the visualization (mps.js):
<tal:block metal:fill-slot="script_layout">
  <script src="//d3js.org/d3.v3.min.js"></script>
  <link rel="stylesheet" type="text/css" href="++resource++myzenpackname/css/patent_suits.css">

  <script
   tal:attributes="src python: context.zport.getVersionedResourcePath('/++resource++myzenpackname/js/mps.js')"
  >
  </script>
</tal:block>
~> I am not sure if this is the best approach for calling the JavaScript file, the Dashboard ZenPack seems to use this approach. However other ZenPacks seem to take a different approach regardless of using zenpacklib.
Now we need to create the resource directory that will contain the CSS and JavaScript files:
mkdir browser/resources
mkdir browser/resources/css
mkdir browser/resouces/js
Copy the CSS source code of the Mobile Patent Suits source code and place it in a file under browser/resources/css/patent_suits.css.
Then let's create the JavaScript file browser/resources/js/mps.js and paste the JavaScript source code after the following lines:
Ext.onReady(function(){

  // Create a panel to put the D3 visualization
  var suits_panel = Ext.create('Ext.panel.Panel', {
    flex: 1
  });

  // Create a panel to represent the whole content area
  var hbox_center_panel = Ext.create('Ext.panel.Panel', {
    layout: {
      type: 'hbox',
      pack: 'start',
      align: 'stretch'
    }
  });

  // Add the visualization panel to the content area
  hbox_center_panel.add(suits_panel);

  // Add the content panel to the original template panel
  Ext.getCmp('center_panel').add(hbox_center_panel);

  // D3 Mobile Patent Suits code here
  /*
    ...
  */

  // We will want to change this line from the D3 visualization,
  // So that the SVG appends to the suits panel
  var svg = d3.select("#" + suits_panel.body.id).append("svg")

});
Registering the Resource Directory
In order for Zenoss to recognize our ZenPack resources, we need to register it in browser/configure.zcml:
<!-- Browser Resources -->
  <browser:resourceDirectory
    name="myzenpackname"
    directory="resources"
    />
Be sure to use the correct name field when referencing the resources in page template files.
If we restart zopectl we should see the visualization in our new custom page:
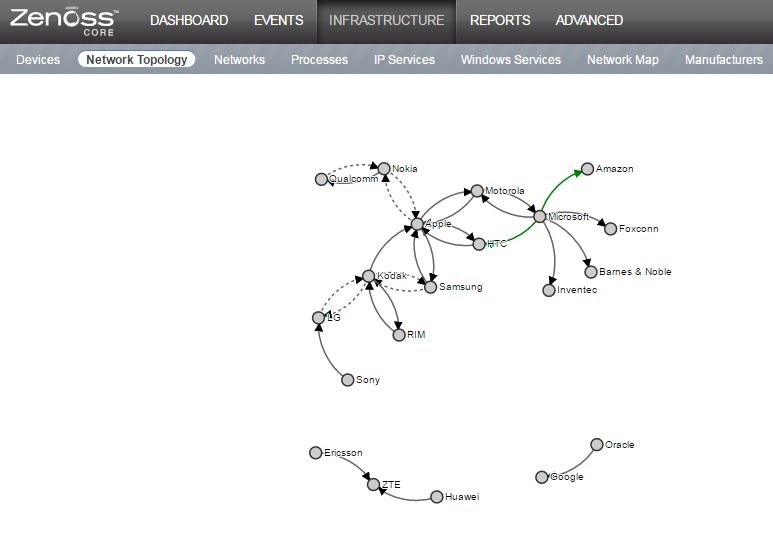
In the screenshot above I actually just added a Network Topology secondary navigation link to INFRASTRUCTURE, and render the visualization on the new page for that link.