Easy Notification System in Rails
Having a notification system is very common for a web application. In this post I will go over how to implement your own simple and easy notification system for your Rails application.
This post is heavily inspired by Chris Oliver's In-App Navbar Notifications tutorial, with a few personal changes and additions.
Read part 2 of this series.
Models and Routes
Before starting with the models, lets quickly define the application resources in our routes:
# config/routes.rb
Rails.application.routes.draw do

  devise_for :users

  resources :posts do
    resources :comments
  end

  resources :notifications, only: [:index]

end
The Notification Model
We will manually generate the notification model which will handle the storing of notifications in the database. We can generate a very basic model like this:
rails g model Notification recipient_id:integer actor_id:integer read_at:datetime action:string notifiable_id:integer notifiable_type:string
Here is an explanation for some of the fields for the above model:
recipient_id: Represents the user in your application which will receive the notification.actor_id: Represents the user in your application which triggered the notification.read_at: The time when the notification was read. A value ofnilis used for unread notifications.notifiable_id: The object that represents this notification (a post, comment, etc). This will be a polymorphic association.notifiable_type: Type of the notifiable object. This is usually represented by a humanized (and optionally, internationalized) string form of the object's class.
Now let's take a look at how the notification model will interact with the other models through associations:
# app/models/notification.rb
class Notification < ApplicationRecord
  belongs_to :recipient, class_name: 'User'
  belongs_to :actor, class_name: 'User'
  belongs_to :notifiable, polymorphic: true

  scope :unread, -> { where(read_at: nil) }
end
Since the foreign keys for :recipient and :actor do not match the user model, we must specify the User class name to indicate that these objects are user objects.
We also add a scope to retrieve all unread notifications from the database.
The User Model
For the user model (assuming we are using Devise), we need to specify that a user has many notifications:
# app/models/user.rb
class User < ApplicationRecord
  # ...
  has_many :notifications, foreign_key: :recipient_id
end
The Notifiable Models
Our application will consist of one or many models that can be notifable. This means that when an action is done with these models by an actor (user), notifications will be generated to the corresponding recipients (users).
In this blog post, I am going to use a Post and Comment model as examples:
# app/models/post.rb
class Post < ApplicationRecord
  belongs_to :user
  has_many :comments, dependent: :destroy
end
# app/models/comment.rb
class Comment < ApplicationRecord
  belongs_to :user
  belongs_to :post
end
Also let's not forget to update the user's associations accordingly:
# app/models/user.rb
class User < ApplicationRecord
  # ...
  has_many :posts, dependent: :destroy
  has_many :comments, dependent: :edestroy
end
Creating Notifications
In Chris Oliver's tutorial, notifications are created in the controller, when the notifiable object is saved in the database.
I prefer creating notifications in the notifiable object model, using ActiveRecord Callbacks.
For example, let's say we want to create a notification for all people involved in a Post, every time a Comment is created in this post. We can create a callback method in the Comment model like this:
# app/models/comment.rb
class Comment < ApplicationRecord
  after_create :create_notifications

  # ...

  private

  def recipients
    # Up to your own implementation
  end

  def create_notifications
    recipients.each do |recipient|
      Notification.create(recipient: recipient, actor: self.user,
        action: 'posted', notifiable: self)
    end
  end

end
You should implement the recipients method in a way that you can obtain an array of all the recipient users you want to send the notifications to.
Now every time a Comment is successfully created, the create_notifications method will be fired, and notifications will be created for each recipient.
Pay close attention to the notification action. In this case we are using a string with a value of 'posted'. We will use this later to nicely render notification templates.
If you would also like to generate notifications for another model (like Post), you can implement again the approach above, modifying the recipients method accordingly.
Displaying Notifications
We will also want to display notifications in our application's navbar, using Bootstrap 3 and JQuery. But before that we need to make it possible for JQuery to send a request to an endpoint to retrieve all the current logged in user's unread notifications.
The Controller
First, let's set up a notifications controller to gather the notifications for the current user:
# app/controllers/notifications_controller.rb
class NotificationsController < ApplicationController
  before_action :authenticate_user!
  before_action :set_notifications

  def index
  end

  private

  def set_notifications
    @notifications = Notification.where(recipient: current_user).unread
  end

end
Notice how we are usign Devise's current_user helper and the unread scope we created in the notification model.
Generating Notification's JSON
We can use the handy JBuilder to generate JSON in this endpoint. Create a JBuilder view in app/views/notifications/index.json.jbuilder:
json.array! @notifications do |notification|
  json.id notification.id
  json.template render partial: "notifications/#{notification.notifiable_type.underscore.pluralize}/#{notification.action}", locals: {notification: notification}, formats: [:html]

end
With this configuration, JSON will be returned when the /notifications.json endpoint is requested.
In this JSON, the most important thing is how we are returning a HTML partial in the template field. Moreover, we are accessing this partial in our views using the notifiable object and the action. Meaning that for the comment notifications we already implemented, the partial should be found in app/views/notifications/comments/_posted.html.erb.
Notification Partials
Let's go ahead and create this partial. I will be using Bootstrap 3 to create notifications as media objects and dropdown items in the navbar:
-# app/views/notifications/comments/_posted.html.haml

%li
  = link_to notification.notifiable, 'data-behavior': 'notification-link', id: notification.id do
    .media
      .media-left.media-middle
        / Maybe put the actor's avatar here
        / = image_tag '...'
      .media-body
        %span.small.text-muted= notification.created_at
        %p
          %strong= notification.actor.full_name
          = t("notifications.actions.#{notification.action}")
          a new
          = notification.notifiable.class.model_name.human.downcase
          in
          %strong= notification.notifiable.post.title
        %p.small.text-muted
          %i= truncate(notification.notifiable.body, length: 100)

%li.divider
Obviously the partial implementation above will depend on you on how you want it to look and what information you want to provide.
Pay close attention to the data attribute data-behavior we are using inside the link_to tag. Later this will allow us to be able to mark this specific notification as read.
Displaying the Notifications with JQuery
With this partial done, its HTML will be passed to our CoffeeScript to be appended into the DOM. Let's take a look at the CoffeeScript code that does this:
# app/assets/javascripts/notifications.coffee

$ ->
  class Notifications
    constructor: ->
      @getNewNotifications()
      @notifications = $("[data-behavior='notifications']")

      if @notifications.length > 0
        @handleSuccess @notifications.data('notifications')

    getNewNotifications: ->
      $.ajax(
        url: '/notifications.json'
        dataType: 'JSON'
        method: 'GET'
        success: @handleSuccess
      )

    handleSuccess: (data) =>
      items = $.map data, (notification) ->
        notifications.template

      $("[data-behavior='unread-count']").text(items.length)
      $("[data-behavior='notification-items']").append(items)
With this CoffeeScript code, we send a request to /notifications.json and receive a JSON array of notification templates from the JBuilder view. We then insert an array of these templates into the HTML element that has the data-behavior='notification-items attribute.
For our example, this element will be an element inside a Bootstrap navbar. Let's take a look at it:
#- app/views/shared/_navbar.html.haml

          / Notifications
          %li.dropdown{ 'data-behavior': 'notifications' }
            %a.dropdown-toggle{ 'data-toggle': 'dropdown', role: 'button', 'aria-expanded': false }
              %span.glyphicon.glyphicon-bell
              %span.badge{ 'data-behavior': 'unread-count' }
              %span.caret

            %ul#notifications.dropdown-menu{ 'data-behavior': 'notification-items' }
              %li.dropdown-header.text-uppercase Notification
              - if current_user.notifications.unread.empty?
                %li
                  .container-fluid
                    %p.text-center.small No new notifications
I have skipped some of the Navbar code for readability purposes. The key things in this navbar HTML are the elements with the data attributes. JQuery will recognize these attributes and populate the HTML template of each notification into it.
Here is an example of how this would look like, from a personal project of mine:
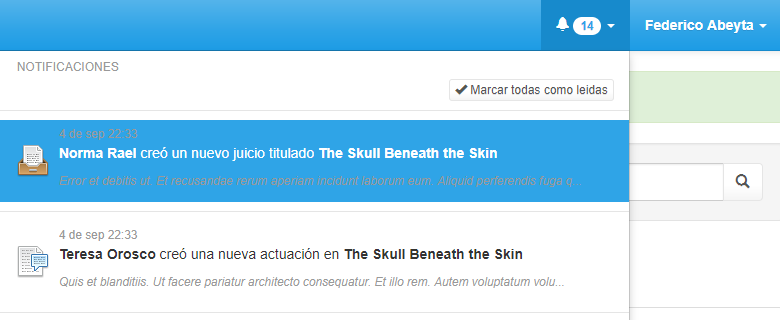
Notice the notification partials in action. You can create different partials for different notifiable models and different actions as well.
Closing Thoughts
So far we managed to create notifications from different models to multiple user recipients in our application. We then managed to display all unread notifications for the current logged in user using JQuery and very handy notification partials.
Stay tuned for part two where I will go over on how to mark as read all notifications as well as individual notifications.