Zenoss Renderers
Zenoss makes use of some very interesting graphical components called renderers. These are used to manipulate the way data is shown in the Zenoss user interface.
For example, a value of total bytes used could be 6080626688 in bytes, which is a very high number and doesn't really convey much meaning. However, we can use a built-in Zenoss renderer called bytesString which will convert this value in bytes to the closest representation:
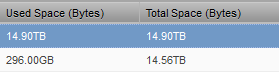
As we can see, this is a much better and meaningful way of displaying the data.
The built-in Zenoss renderers and source code can be found in $ZENHOME/Products/ZenUI3/browser/resources/js/zenoss/Renderers.js
They are a list of registered Javascript functions that can be assigned in our YAML definitions file by adding the renderer property. For example:
HardDisk:
  base: [zenpacklib.Component]
  label: Hard Disk
  properties:
     location:
        label: Location

     capacity:
        label: Capacity

     raid_name:
        label: Raid Name

     raid_level:
        label: Raid Level

     status:
        label: Status
        renderer: Zenoss.render.pingStatus
Zenoss.render.pingStatus is one of the default renderers that come built-in within Zenoss Core 4, similar to Zenoss.render.bytesString.
Creating Custom Renderers
It is also possible to create our own custom renderers that our classes can use. To do this, we create a new directory called resources within our ZenPack. Under this directory we will create a new Javascript file where we will register our new renderer(s) for our ZenPack.
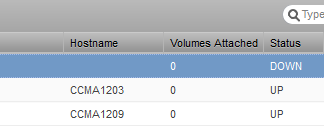
For example, let's assume our ZenPack has a ApiService class that has a property called status. The value returned for this property is an integer that represents that status of the service. These are the possible statuses and their value-meaning:
UP: 0
DEGRADED: 1
DOWN: 2
INIT: 3
Showing the integer values for the status property in the user interface is not very meaningful to the user. To solve this, we can create a custom renderer that will evaluate the value and simply return a string for each possible value, this string will be a better and much more meaningful representation for this property.
In our resources directory, we create a new Javascript file called Service.js (can be any name)
Here we create and register our new renderer as follows:
Ext.apply(Zenoss.render, {
  api_ServiceStatus: function(n) {
      var status = parseInt(n)

      switch (status) {
          case 0:
              return "UP"
          case 1:
              return "DEGRADED"
          case 2:
              return "DOWN"
          case 3:
              return "INIT"
          default:
              return "UNKNOWN"
      }
  }
});
Now we can assign this new renderer in our YAML file:
ApiService:
  base: [zenpacklib.Component]
  label: API Service
  properties:
    status:
      label: Service Status
      renderer: Zenoss.render.api_ServiceStatus
We re-install the ZenPack, restart zopectl and zenhub services, and check our interface for the new results: